Thursday, May 28, 2020

DK7ZB Duoband Yagi for 2m/70cm by Kevern ZS1ABU


Kevern ZS1ABU writes:  I will post a few pictures of a Yagi we build a few years ago. It was build mainly to use for the Pears and SARL VHF/UHF Contests. We received many 1st and 2nd places using this antenna. Its cheap to build and all the hardware can be bought from Builders Warehouse, except the little standoffs which was made by Dieter ZS1DWH on his 3D printer. This was made from plans and examples on the well known website : https://www.qsl.net/dk7zb/Duoband/4+5_2m-70cm.htm


DK7ZB writes:  The 4-El.-Ultralight-Yagi for 2m can be used on 70cm with an SWR of 1,5 without any changes. The pattern and the currents of the Yagi are shown down. The Yagi has three forward lobes (according to the three current maxima in the 3/2-lambda-radiator) with 5,39dBd - 4,35dBd -5,39dBd gain. We can use this Yagi without any changes on 2m and 70cm.


For more information and diagrams, please visit the well known website of DK7ZB.  Here is the link:  https://www.qsl.net/dk7zb/start1.htm
and his amateur radio website at:  https://www.qsl.net/dk7zb/

Monday, May 25, 2020

Crystal Radio Set - LM RADIO X3 STATIONS AM by Johan ZS6IW Denotter


Click the link HERE to watch the video of the Crystal Radio in operation.


Danie ZS1DBJ George:  Môre Johan. Hoe ver is jy van die AM sender?

Abe ZS1ZS Mosselbaai: More Julle, Ons het 'n spoel gedraai om toilet rolle

Abe ZS1ZS Mosselbaai: en minora skeer lemmetjies gebruik vir verstellings kapasitors en 'n ou kristal oorfoon gebruik om te luister. Was nogal lekker. Johan pragtig jou spoel en luispreker / versterker

Johan ZS6IW Denotter  Hi. Seker so 40 km.
Die ander twee is kerkstasies wat nog altyd op MW is.


162 Mhz Slim Jim Project by Christie ZS4CGR Luckhoff


My "bender" vir 9.5mm Al.


HF Magnetiese Lus Antenna deur Danie ZS1DBJ


Danie ZS1DBJ George: Ek het weer bietjie gespeel met my magnetiese lus antenna en ingestel op 18.1Mhz. Coax gebruik vir die kapasitor. Elke cm is ongeveer 1pF.

Hentie ZS1LH Mosselbaai vra:  Danie sal die lus kan resoneer op 3,67 en/of 7,100?
Ek dink aan iets vir Danabaai as ek daar tussen die klomp ou mense gaan woon.

Nick ZS1N Boggomsbaai vra:  Danie wat is die omtrek van die lus?


Danie ZS1DBJ: Nick hier is mates. Verkoeling tipe koperpyp.

Abe ZS1ZS Mosselbaai: Danie is ons boffen met Magnetiese Lus Antennas. 80m mag dalk 'n opsie wees Hentie, darem nie te groot nie.

Abe ZS1ZS Mosselbaai: Wag so 'n jaar gelede by Henry ZS1AAZ en hy het 'n monster gemaak wat 'n vacuum tube gerbruik. Hy het ook 'n MFJ wat hy in sy agterplaas opgesit het. Ook 'n probleem met kompleks wat nie van antennas hou nie.

Danie ZS1ZS George: Nie boffin nie. Maar wel proeffin. Net proefnemings. Vir 80 meter moet die lus baie groter wees.


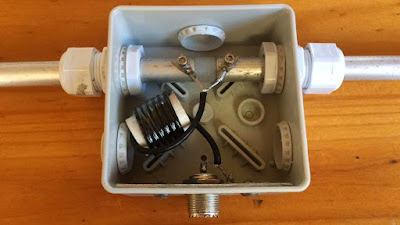
Magnetiese lus antenna deur Danie ZS1DBJ. Die koperlus het ń diameter van so 650mm en is gemaak van 16mm diameter koperpyp. Die koperpyp is afkomstig van ń verkoelings besigheid. Dit is sagte koper en maklik buigbaar. Die plastiese houers is afkomstig van gordyn reelings.  Die kapasitor vir die lus bestaan uit RG213 coax. Die kapasitansie vir die coax kapasitor was bepaal deur ń verstelbare kapasitor op die lus te koppel en met analiseerder die waarde te bepaal vir resonansie teen 18.104Mhx. ń Lengte RG213 coax is toe aan my kapasitansie meter gekoppel en stukkie vir stukkie korter gemaak totdat coax kapasitor en toets kapasitor se kapasitansie lesings eners was. Die gesnyde coax is toe aan lus gekoppel en met behulp van antenna analiseerder verder "getrim" vir resonansie op 18.104Mhz. Die volgende stap is om 2 klein stukkies PC bord aan onderkant van coax aan te bring vir "fine tune" aangesien die antenna ń baie hoë Q waarde het en is baie gevoelig op verskillende posisies. Ek sal moet kyk na motor beheer vir die "fine tune" kapasitor. Lus se koppeling met radio is via die "gamma matching rod". Die verstelling vir 50 Ohm word gedoen deur ń kortsluit brug op die lus en "matching rod" te skuif.   ń SWR waarde van 1.3 en Ohmwaarde van 50 kon bereik word. Die Icom 7300 se SWR toets fasiliteit het ook ń goeie SWR aangedui. Toetse is tot 20 Watt uitset beperk aangesien ek nie seker is van RG213 se isolasie spanning tussen geleier en afskerming nie. Op ontvangs is die antenna redelik vry van geraas.

Thursday, May 21, 2020

Building the Reboot AllStar Link Network (ZS1I-L) in Mossel Bay

Image (Top):  Reboot AllStar Node

So, what is the Reboot AllStarLink Network all about?

AllStarLink is a network of Amateur Radio repeaters, remote base stations and hot spots accessible to each other via Voice over Internet Protocol. AllStarLink runs on a dedicated computer (including the Rasperry Pi) that you host at your home, radio site or computer center. It is based on the open source Asterisk PBX running our app_rpt application. App_rpt makes Asterisk a powerful system capable of controlling one or more radios. It provides linking of these radio "nodes" to other systems of similar construction anywhere in the world via VoIP.

AllStarLink's primary use is as a dedicated computer node wired to your repeater or radio. Connections from Echolink, other VoIP clients and telephone calls are suported. We also have a Java Applet which can be used on older computers to access AllStarLink nodes.

For more information on AllStar visit the following two links:


We are often asked why Allstar with all of the new RF digital repeaters and their VOIP connection schemes out there. The best answer is open source, quality audio, and freedom to do what you want. Dstar, Fusion, DMR, etc are all at least partially if not completely proprietary systems. In most cases the VOIP connection system that makes them somewhat like Allstar is proprietary. Code plugs, Rooms, etc. all make for a confusing and hard to maintain system. It also makes a system which is managed much like IRLP. The individual users has little control other than to connect somewhere. Then there is the lousy audio that goes along with the current Amateur Radio digital RF schemes.

Allstar connects RF systems with full duplex quality audio. It also gives the user a choice in how and where they connect. Private or public group or individual connections can be setup quite easily. If you are in a restricted living environment like a retirement home or HOA that does not allow antennas Allstar gives you the radio feel without an obtrusive antenna or big expense. You could setup a simplex node in your apartment or dwelling and have local coverage with in a few blocks to several miles between your handheld and you own personal node. Couple that with the ability to setup connections to all your buddies that also have nodes and you have your own talk group with everyone using real radios to access. You also have the ability to access via computer, phone, Echolink, and many other methods.

The advent of the inexpensive small board computers and very easy scripted setup make getting on Allstar easier than ever. A savvy user who has the ability to make some modifications and build some simple circuity could get on Allstar for well under R1650. A totally plug and play system minus the node radio would be no more than R850.

For repeater operators Allstar is a complete repeater controller that probably has more flexibility and capability than any repeater controller on the market. It is certainly cheaper. Because it runs in Linux and is open source the user has full flexibility to use scripts, timers, multiple ports, etc. to do just about anything they would want.

So if you like to call your own shots come join the friendly world of Allstar. You will be surprised how easy it is to get started and a world of adventure awaits you.

The Reboot Allstar build started way back in June 2019. 

AllStarLink Node Features:
  • Full Feature Repeater Controller
  • VoIP Full Duplex Linking with great audio
  • Frequency Agile Remote Base Station
  • Simplex (half-duplex) Station
  • Echolink
  • APRS
  • Autopatch
  • Based on Asterisk - the Open Source PBX
  • Real-time status reporting
It will be impossible to describe the complete build here but there is more than  enough information contained in the above links to construct your own AllStarLink System.  I will however illustrate the build with photos and notes of the build.

The Reboot Allstar Link  Network hardware used entails the following:
Information on the Reboot AllStar Link Network:

Call Sign:  ZS1I-L
Frequencies:  [1]  433.400 Mhz [2] 145.525 Mhz
AllStar Node Number:  49355
Echolink Node Number: 108551
Description:  AllStar Simplex Radio Node

How to use the Reboot AllStar Link Network.  Node#  49355:

It is quite simple.  If you use Echolink just connect to ZS1I-L and your audio will automatically be relayed to the Reboot AllStar Link. Use Echolink as you would for any other Echolink station.  If you use AllStar just connect to Node Number *349355.  Disconnect:  In Echolink use the disconnect button.  In AllStar use *149355.

Current DTMF Function Services for Reboot AllStar Link Network using Echolink, HT Radio, Zoiper, iaxrpt or IAX DV Switch. (Please note this is currently only basic services/features)

DTMF Function List:

*1  = Link Disconnect
*2  = Link Connect (Monitor Only, no TX)
*3  = Link Disconnect
*70  = Link Status
*75  = Full system status (all nodes)
*80  = System Info
*81  = Time and Weather Information for Mossel Bay

If you mobile/fixed in the area of Mossel Bay you can use a VHF/UHF Radio to connect to the Reboot AllStar Link Network.  Use the above DTMF function to firstly connect to *349355 and then to any other Echolink or AllStar node of you choice in the World.  UHF Frequency:  433.400 Mhz  / VHF Frequency 145.525 Mhz.

For those using APRS, the Reboot AllStar Link Network is also reflected on APRS-fi, call sign ZS1I-1  Information on the node numbers and radio frequencies are displayed.


Further updates related to functions/services are planned for the future.  Please feel free to use the Reboot AllStar Link Network at any time.  Just announce your call sign and intentions and enjoy the network.

Here is a few build images of the ZS1I-L NODE:


Image (Top):  Modifying the Baofeng 888


Image (Top):  Modifying the Baofeng 888


Image (Top):  Testing the StarTech USB Soundcard


Image (Top):  Completed StarTech Sound Card FOB


Image (Top):  Testing the StarTech Sound Card FOB


Image (Top):  Check the cabinet outlay.


Image (Top):  Check the cabinet outlay.


Image (Top):  Preparing the cabinet.


Image (Top):  Preparing the cabinet.


Image (Top):  Preparing the cabinet.


Image (Top):  Installing the modules.


Image (Top):  Installing the modules.


Image (Top):  Modules installed.


Image (Top):  Completed Reboot AllStar Project


Top Image Reboot AllStar Node Link in use. Johan ZS6IW connected to the node.